Home > Blog > How To Guides >
Where did my email go? – How to whitelist emails
Spread the word! Share this article:
Email is awesome
Email is such a useful and handy tool, and one we couldn’t really live without.
But it can be a bit frustrating at times when emails just seem to vanish…
Let’s say you just found an awesome new website, packed with great information, and you see there’s a signup to their mailing list, cool!
Like this one for example… Profitability Virtual Assistance mailing list
Fresh tips and tricks, links to articles, special offers and so much more, all delivered straight to your inbox.
You press the right buttons, you get signed up, but what happened to the welcome email you were expecting? Where did my email go?
How about re-setting a password. You have a message that says ‘check your mailbox’ but you can’t see the email anywhere…
Signing up for a member area on a site, adding yourself to a directory, where did the emails go? You get the picture…
So, what’s going on, where did my email go?
The major email providers filter a lot of spam which is great, nobody wants to read about cheap fake Rolex watches (that may or may not work), schemes to collect millions of dollars (that don’t exist) from some Prince you’ve never heard of, or get bombarded with phishing scams trying to trick sensitive information out of you.
Gmail for example estimates they filter over 10,000,000 mails globally every minute of every day, now that’s a lot of junk!
Often these filters are a bit over enthusiastic though, a bit aggressive if you like, and the emails that you actually want to see get filtered out amongst all the noise.
What to do to see my emails in my inbox
There is a solution, and that is to whitelist the email address (or domains) so that the emails you’re expecting to see drop cleanly into your inbox where you want them to be.
In this article I’ll go through the process of how to whitelist emails with the three major providers, Gmail, Outlook.com and Yahoo! Mail
On the sending end… when sending emails
Before I get started on how to whitelist emails you want to receive, I’ll touch briefly on what is a good idea if you’re the one sending them.
Here at Profitability Virtual Assistance we take the approach that we want to be as helpful as possible, and because we’re aware that emails often go astray when people are interacting with us, we let them know what to expect with a quick and helpful message.
We find this helps a lot, and it may be an approach you might want to adopt too if you’re sending emails out.
Here’s a message we created for one of our Client’s email automations.

How to whitelist emails – the major providers
So let’s get into the details regarding how to setup whitelisting in the email provider you’re using.
Whitelisting Gmail
There are 3 approaches you can take in Gmail to get your emails working the way you want them to
Sign in to your account at Gmail.com and follow the steps below.
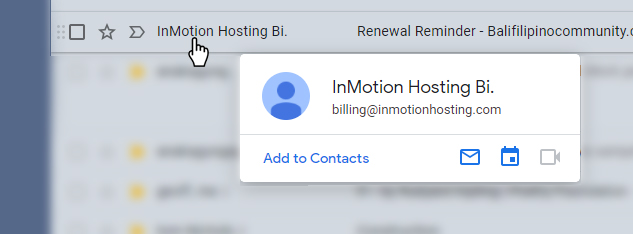
Add the address to your contacts
Having the email sender in your contact list is a great way to let Gmail know that they are a trusted source of info and to let their emails through
- Hover over the name or email address, and in the box that pops up press Add to contacts
Mark messages as ‘not spam’
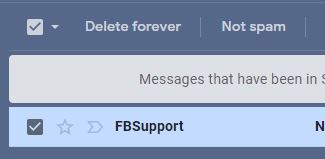
Let Gmail know that the message you’re looking at is in fact not spam, and Gmail will send it through to your inbox for you.
- Navigate to your spam folder
- Find emails from the domain you want to whitelist
- Select all the emails you’ve found
- Click More and then Not Spam
Create a filter for the address
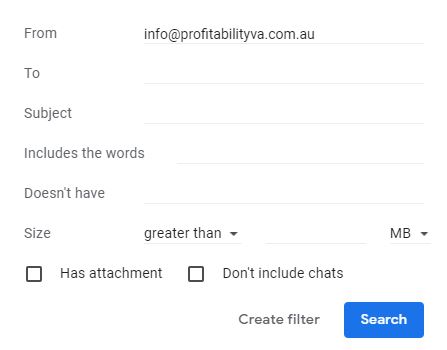
By doing this you’re telling Gmail exactly where you want the email to be delivered.
The great thing with this is that it doesn’t necessarily have to be your inbox. If you like to be nice and organize you can choose any folder you like (including ones that you make yourself)
- Click on the setting cog in the top right of the interface
- In the quick settings that pops up select See all settings at the top
- Click on Filters and blocked addresses, scroll to the bottom and click Create a new filter
- Work with either the From or To field for the email you want to whitelist. I suggest using from
- Don’t use both, if you do Gmail will only filter if both are conditions are met, so it won’t do what you’re probably expecting.
- Enter either the specific email address or whitelist the entire domain.
- Click Create filter with this search
- A box box headed When a message is an exact match for your search criteria pops up, in this boxselect Never send it to spam
- Click the create filter button
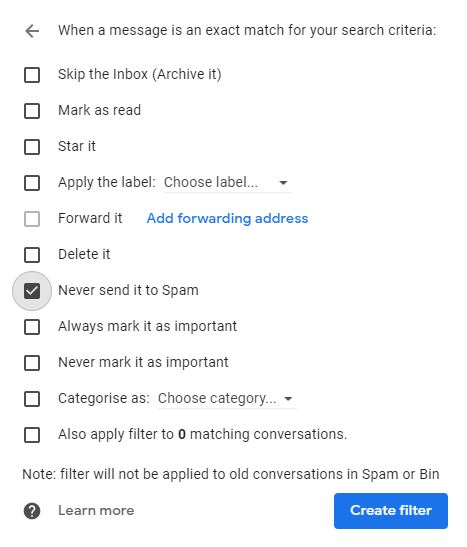
I mentioned that this can also be used to organize your emails. To do this when you have the When a message is an exact match for your search criteria box open, select the Apply the label option, and in the dropdown, you can select where the mail goes.
All of this will do the trick, but if you’re curious and want even more info you can visit their page here https://safety.google/intl/en_us/gmail/
Whitelisting outlook.com
These instructions also apply to Windows Live Mail, Hotmail and MSN Mail
sign into your account at Outlook.com and follow the steps below.
Flag an email as not junk
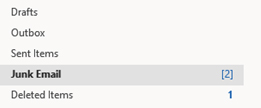
If you do spot an email in your junk folder that you know shouldn’t be there it’s a simple thing to let outlook know that these should be handled differently and go to yor inbox instead.
- Look in your junk folder
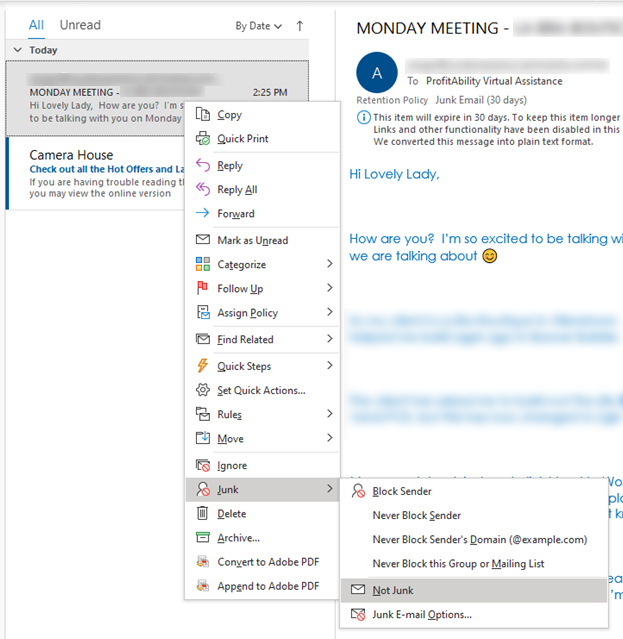
- Right-click on the offending email
- In the popup select Junk, and Not junk
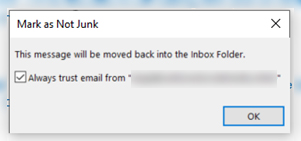
- You will get a confirmation, select ‘always trust email from‘ and hit OK
Add the address to your contacts
Having the email sender in your contact list is a great way to let Outlook.com know that they are a trusted source of info and to let their emails through
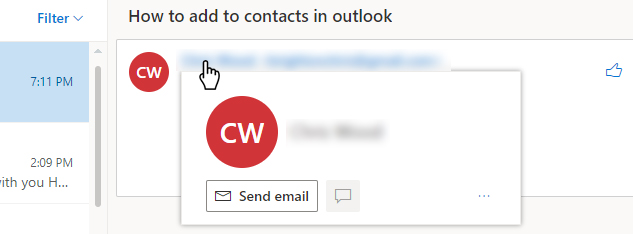
- Have the mail open in the preview pane
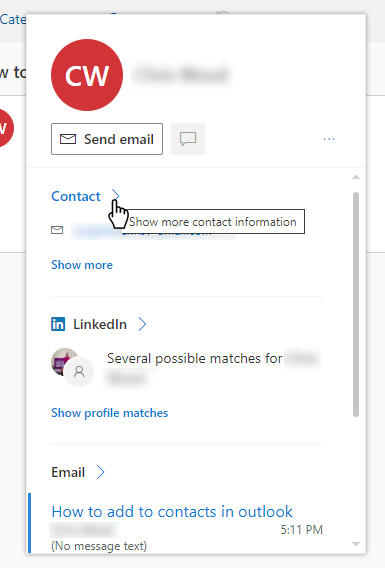
- Hover over the name until the popup expands
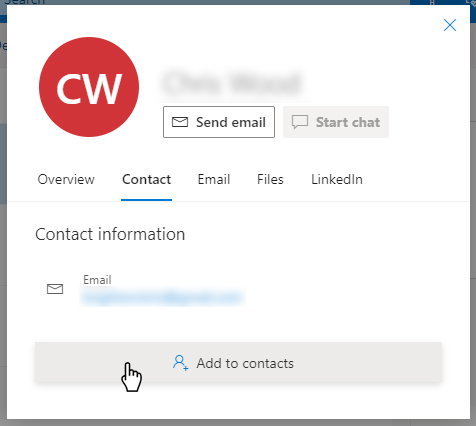
- Expand the contact section
- Click Add contact in the new popup
Add the address to your safe senders
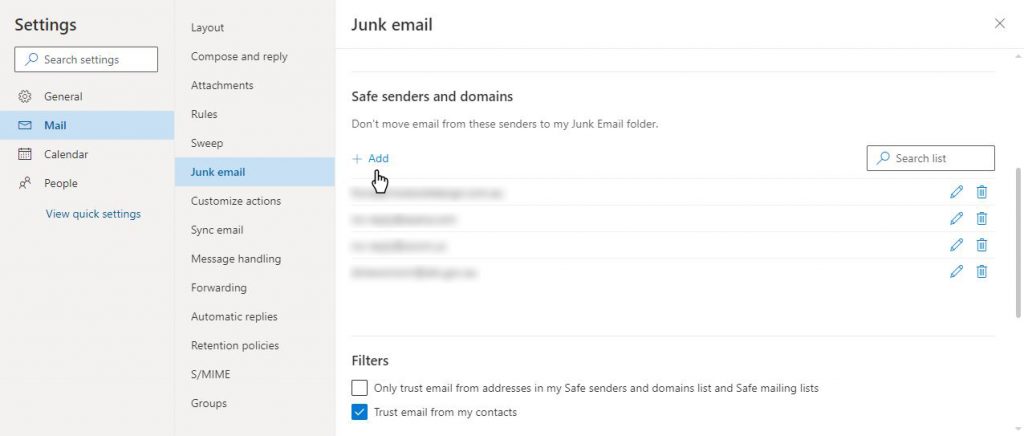
- Click the settings icon (the cog)
- Select view all outlook settings
- Mail should be selected, in the submenu select Junk email
- Scroll down until you see Safe senders and domains
- Click Add to include the email addresses you want to be in the safe sender list
For more information you can have a look at the official Microsoft article I didn’t receive an email someone sent to my Outlook.com account
Whitelisting Yahoo! Mail
Add the address to your contacts
Yahoo! Will usually deliver emails if the sender has been added to your contact list.
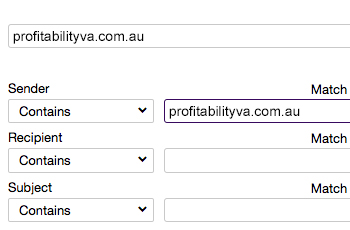
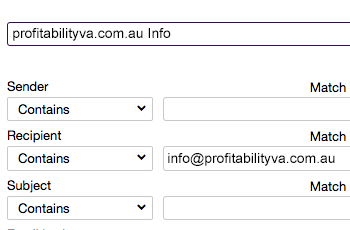
In both the Sender and Recipient fields, you can enter either a specific email address or an entire domain
Create a new filter for each domain or address you want to filter
- Mouse over the Settings menu icon and select Settings
- Click Filters and then Add
- Enter a Filter Name
- Either
- enter the domain of the email you want to whitelist in the Sender field, or
- enter the email address you want to whitelist in the Recipient field
- Select Inbox as the folder to deliver the email to
- Click Save and then click Save again
Summary – Whitelisting your email
It can be a bother trying to track down where that elusive email ended up, and I hope this simple guide into whitelisting your email has shown you the easy steps to take so that your emails never go missing again.
Of course, you could avoid the hassle of email entirely… If you’d like someone to manage your email for you we offer a virtual assistance package that covers this and can be tailored to add even more support if you’re looking for extra help.
If you’d like to know more about the services we offer or would like to book a chat to go through how we could assist you then please click on a button below.
Spread the word! Share this article:
Scale, Survive & Thrive
ProfitAbility Virtual Assistance specialises in Small Business Support for Business Owners


